| Resolving Dependencies Interactively | ||
|---|---|---|
 | Resolving package dependencies |  |
If a dependency problem arises that cannot be handled using the immediate dependency resolver, aptitude can assist you in resolving it. As soon as a problem occurs, a red bar will appear at the bottom of the screen with a summary of aptitude's suggestion about how to fix it. For instance, in the following screenshot, aptitude is indicating that it can resolve the situation by keeping two packages at their current versions.
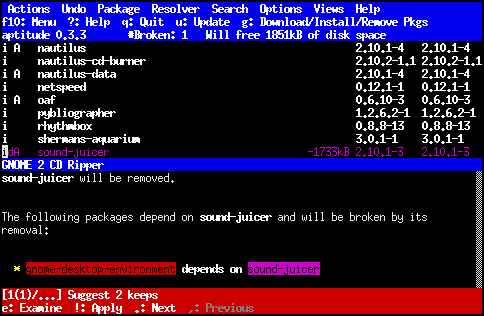 |
As indicated at the bottom of the screen, you can view additional solutions by pressing . and ,, apply the current solution by pressing !, and examine the solution in more detail by pressing e. When you examine the current solution, a screen similar to the following will appear:
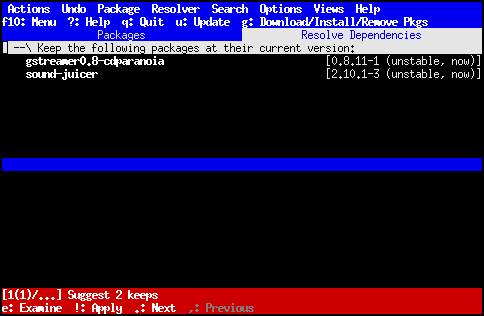 |
You can access information about the package affected by an action by simply pressing Enter while the package is highlighted. For a more detailed explanation of why aptitude made a particular decision, you can highlight the element in the list. When you do so, the lower half of the screen will display the dependency which was resolved by aptitude's choice, along with every way in which this dependency could have been resolved.
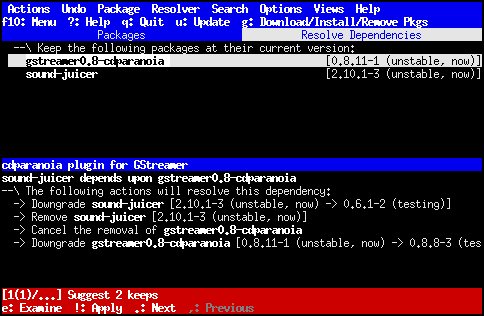 |
You can guide the dependency resolver to a solution of which you approve by approving or rejecting the individual actions of a solution. If you approve an action, the resolver will choose it whenever possible, ignoring alternatives (when there are several approved alternatives, any one of them could be chosen). On the other hand, if you reject an action, the resolver will never choose that action.
To reject an action, highlight it and press r; the rejection can be cancelled by pressing r again. Similarly, select an action and press a to approve it; press a again to restore its original state. You can undo either action by using → (Control+u) while the resolver screen is active. If you cancel a rejection or an approval, any solutions that were ignored will be available the next time that you generate a new solution.
![[Note]](images/note.png) | Note |
|---|---|
By default, the resolver rejects actions that change the
state of held packages, or that install forbidden versions
of packages. You can override these rejections, thus
allowing the hold or forbidding to be automatically
overridden, in the same way that you would override any
other rejection. Setting the configuration option |
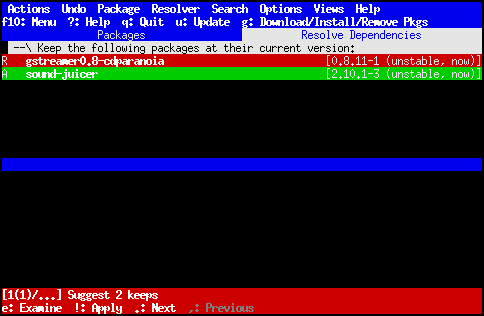
Rejected actions are colored red and marked with an
“R”, while approved actions are colored green
and marked with an “A”. You can see this in
the following screenshot, where the action “keep
gstreamer0.8-cdparanoia at its
current version” has been rejected, and the action
“keep sound-juicer at its
current version” has been approved.
 |
Rejections and approvals only affect newly
generated solutions. You can tell when a new
solution will be generated by examining the indicator in the
lower left hand corner of the screen: if there is a number
in parentheses, it is the number of solutions that have been
generated. Thus, when the number outside the parentheses
and the number inside are identical (as above), pressing
. will generate a new solution. If there
is no number in parentheses (for instance, the indicator
reads [1/5]), then there are no more
solutions to generate. At any time, you can select the
last generated solution by pressing >,
and the first generated solution by pressing
<.
![[Important]](images/important.png) | Important |
|---|---|
The state of the problem resolver is discarded when you modify the state of any package. If you mark a package for installation, for upgrade, for removal, etc, the resolver will forget all of your rejections and approvals, as well as all the solutions that have been generated so far. |
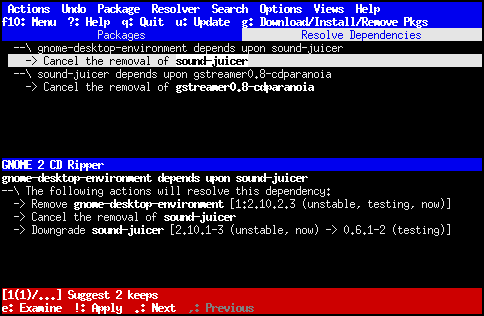
In addition to selecting actions in the list at the top of the screen, you can also select them using the list in the bottom half. To access this list, either click in it using the mouse or press Tab. Finally, to see the decisions that the problem resolver took arranged in order, press o. This will give a list of the dependencies that were resolved and the action taken to resolve them, as in the following screenshot.
 |
You can leave this display mode by pressing o again.